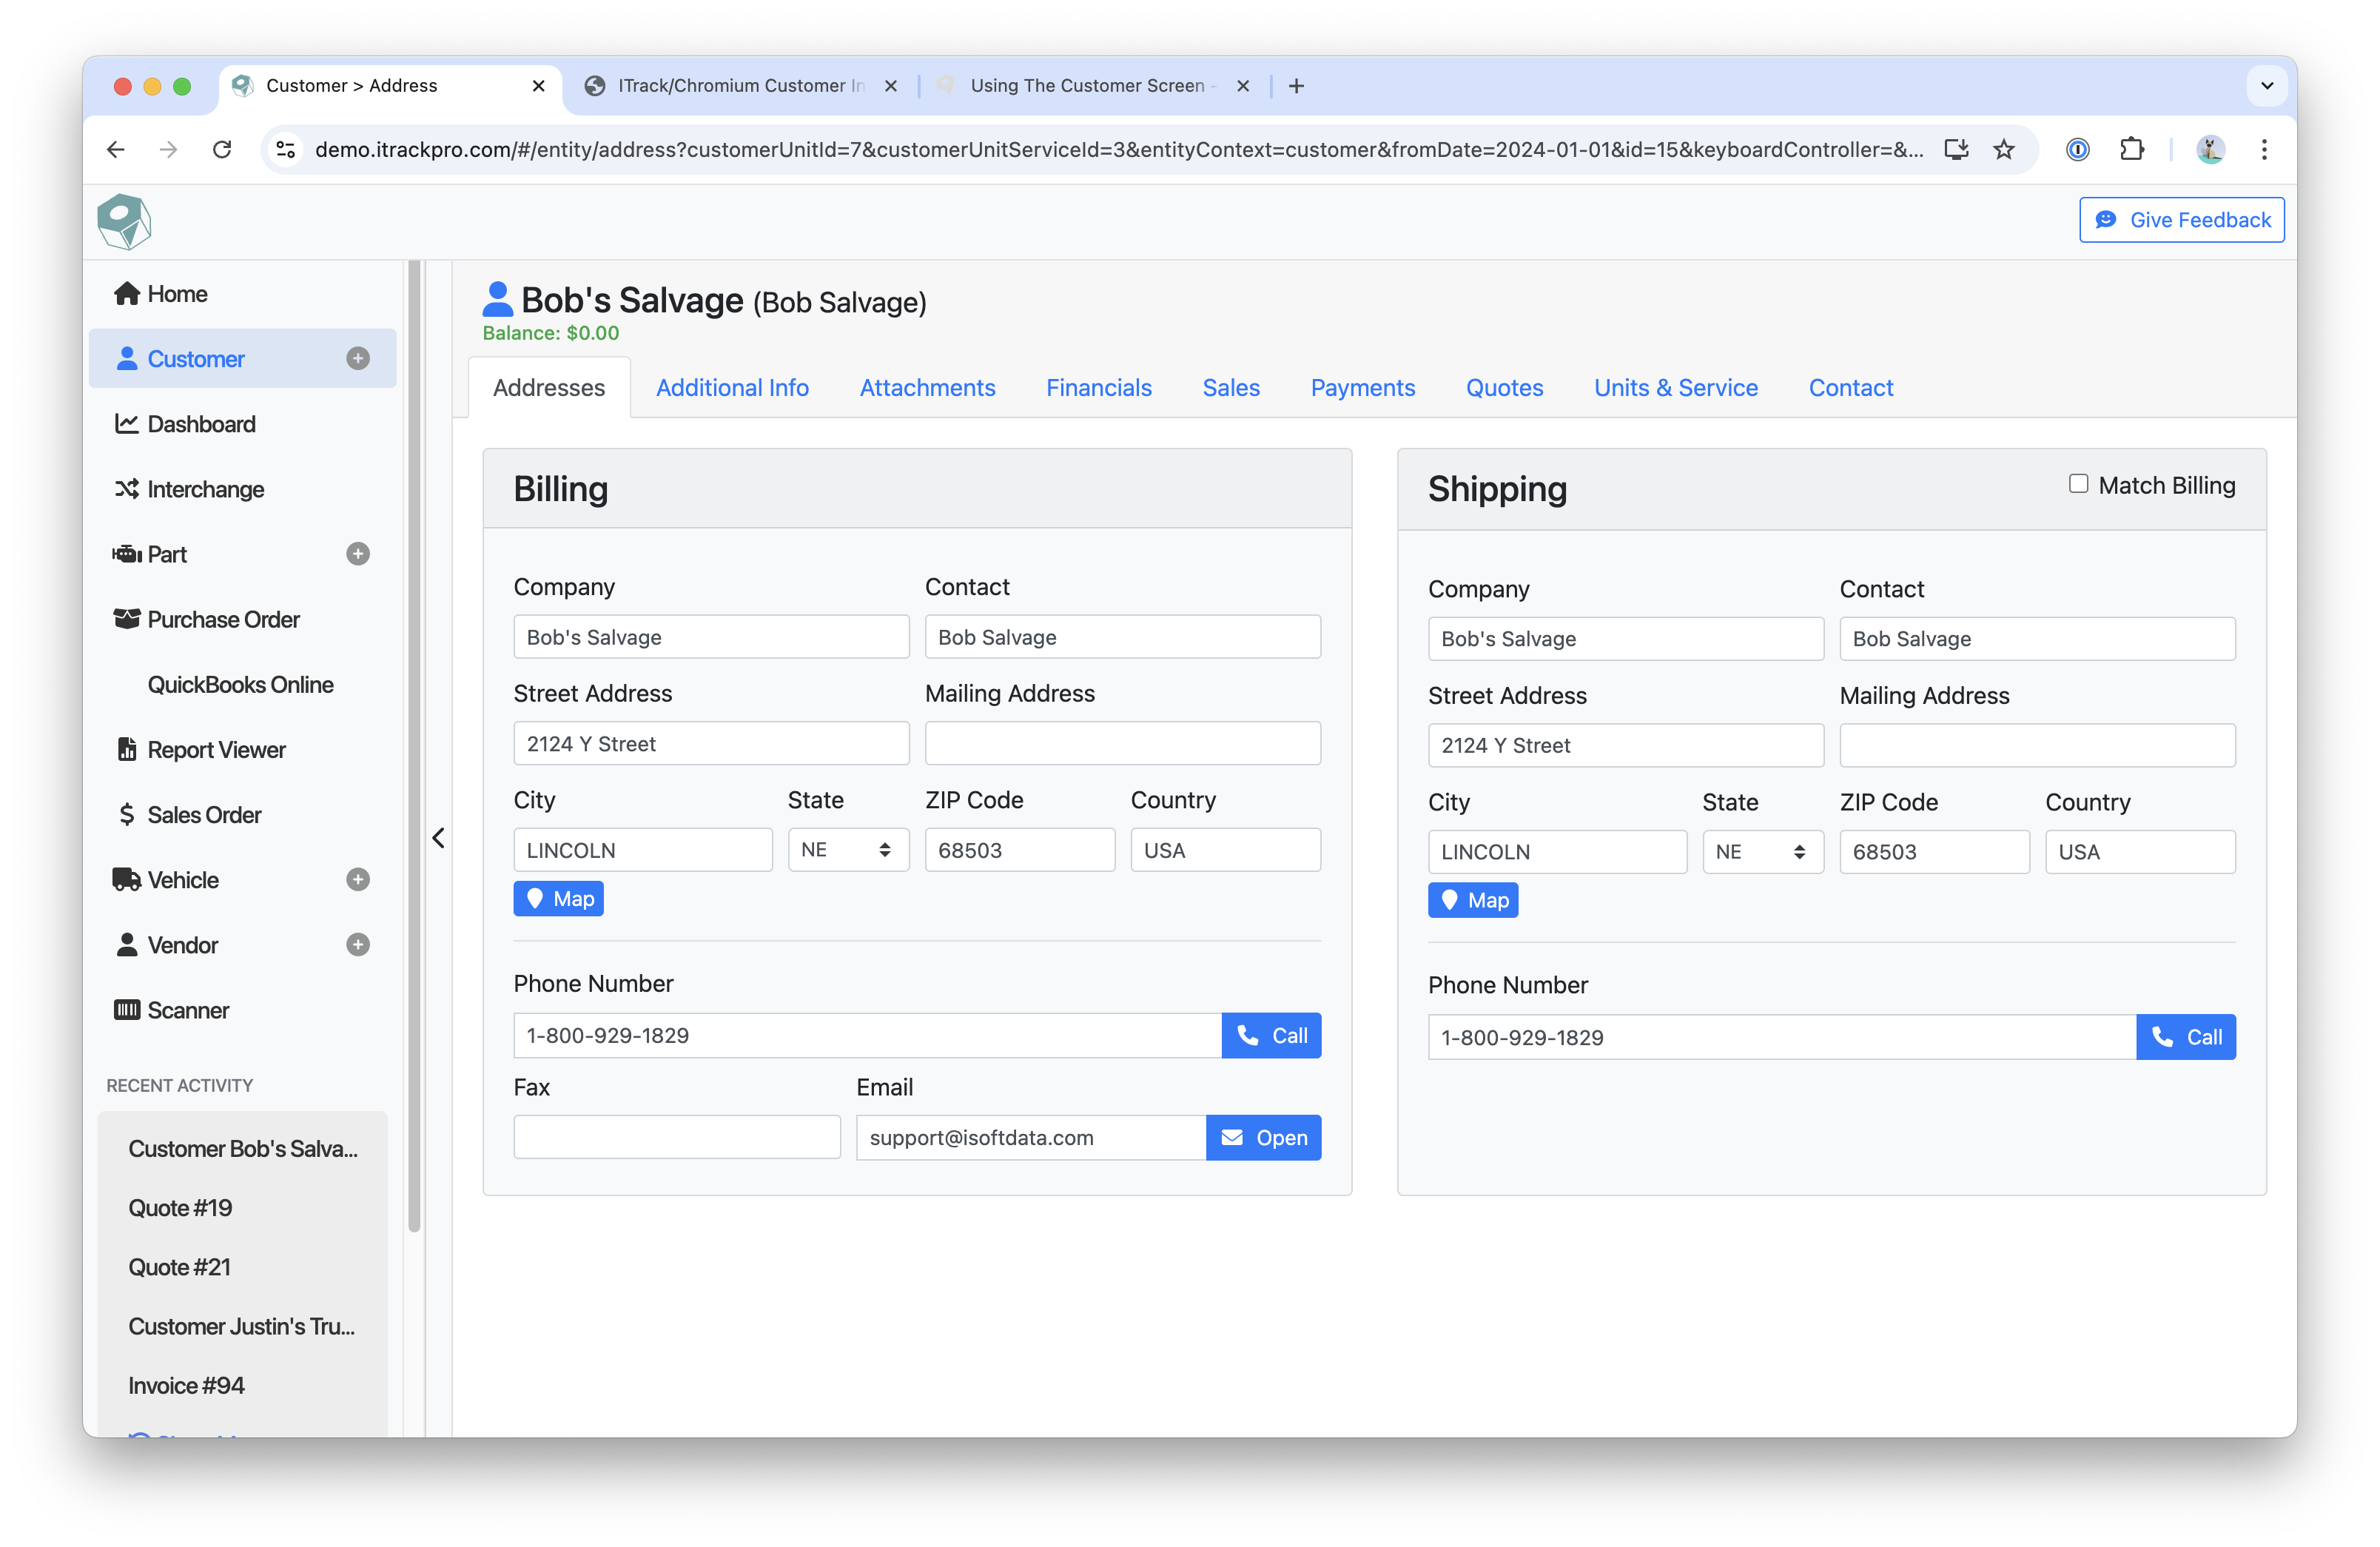
With a customer selected, you can manage their information, such as phone numbers, addresses, and more.
Addresses Tab
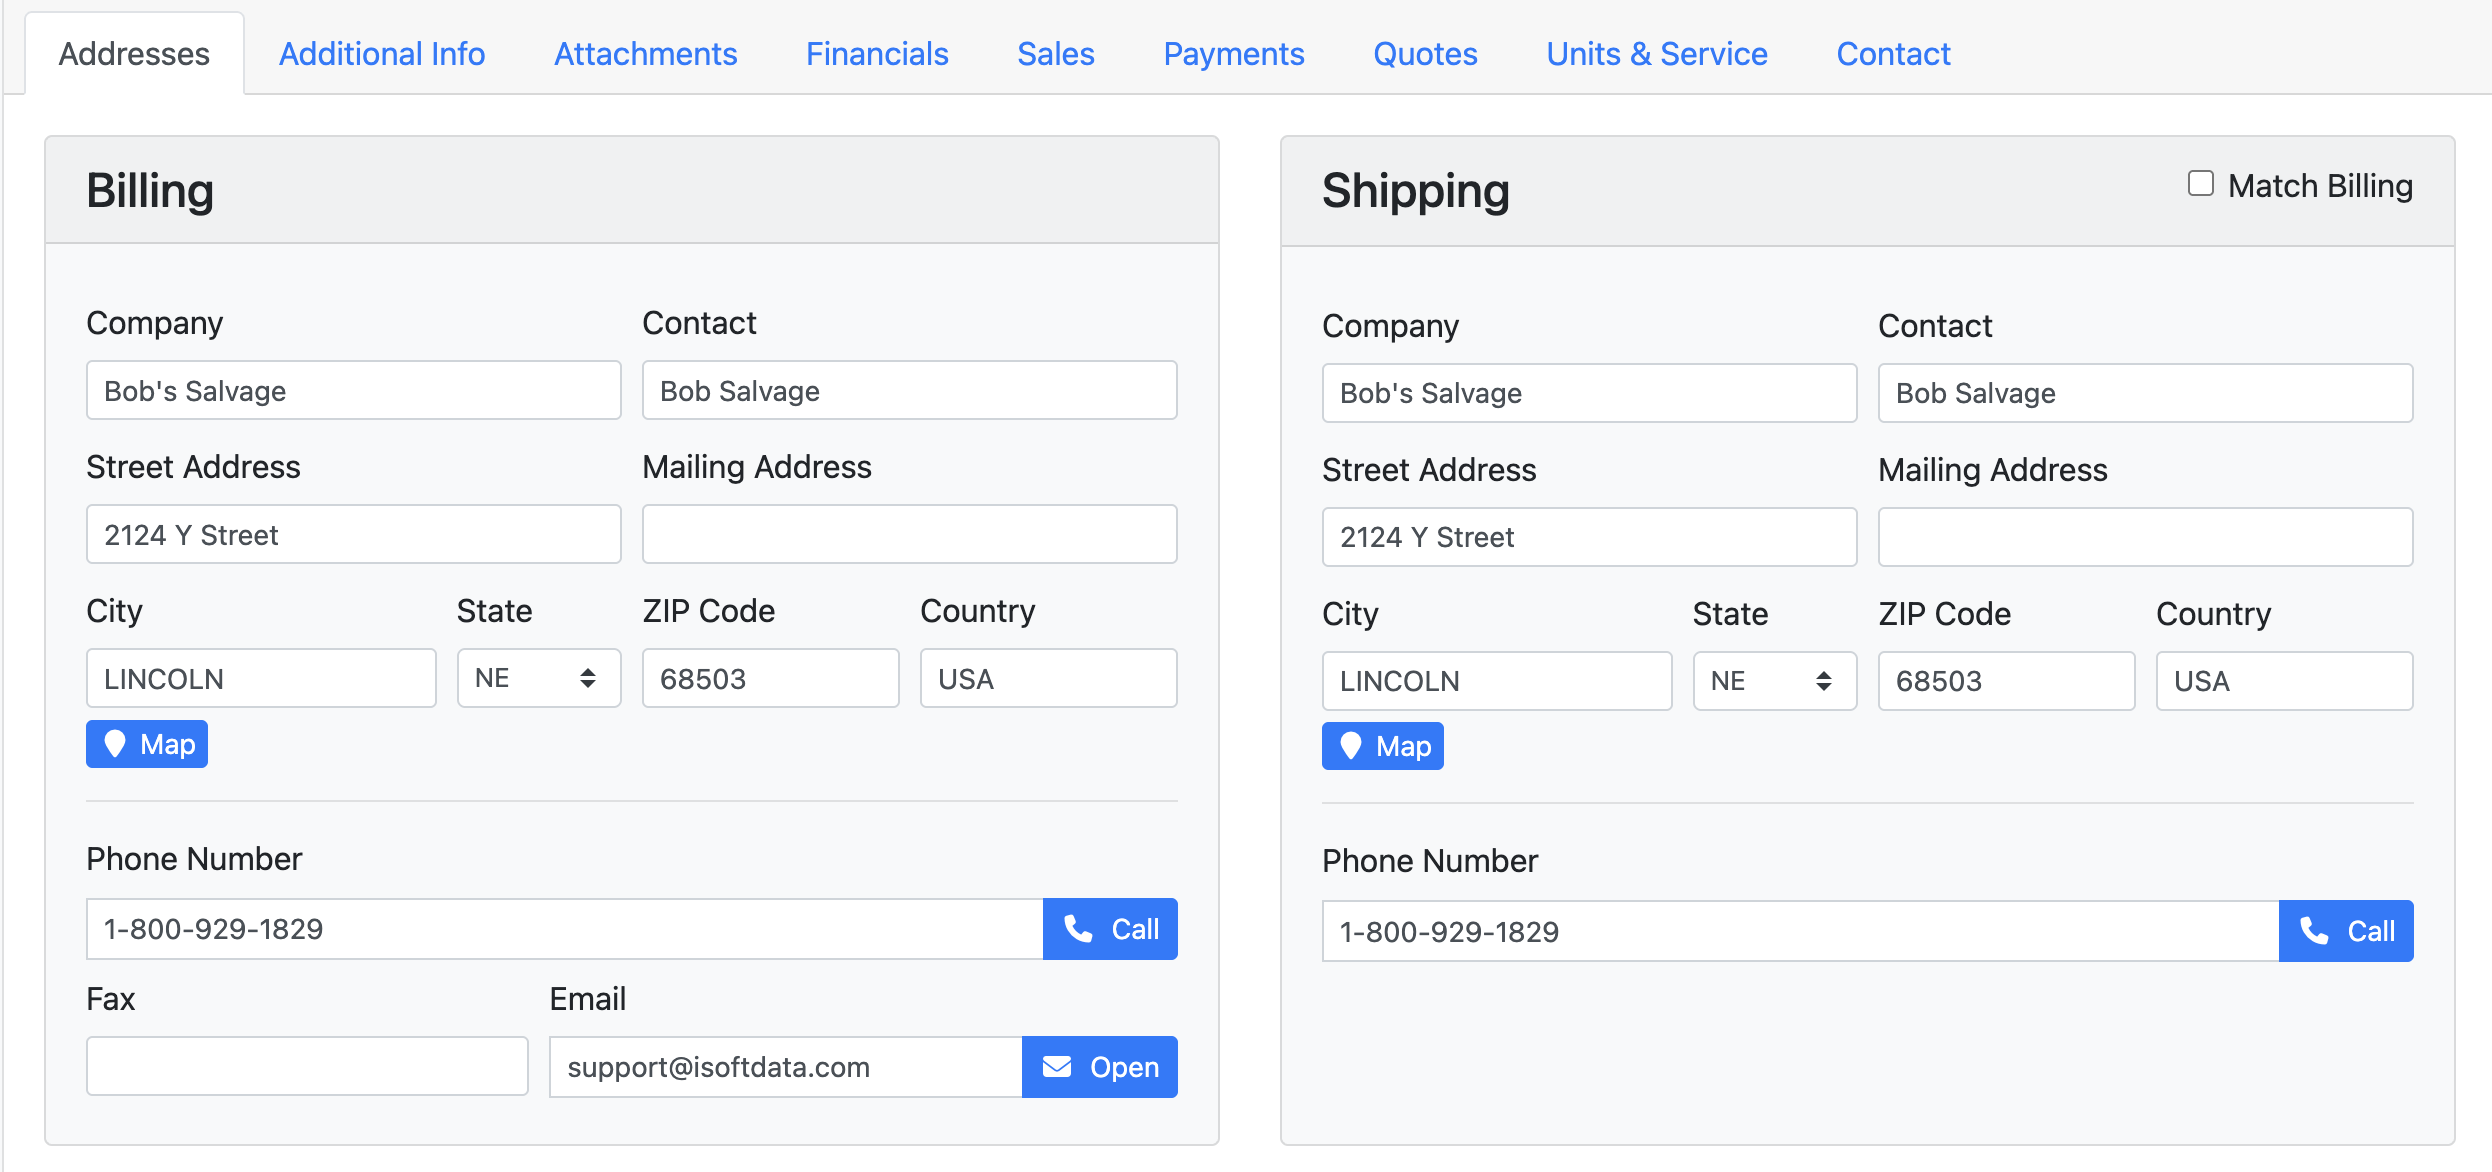
On the Address Tab, you will be able to edit the Billing and Shipping information for the customer.
-
Click Map to open the address in Google Maps
-
Click Call to call the phone number
-
Click Open to open a new email in your preferrered email app with the email address filled in
-
Enter in the Zip Code first, then the city, state and country will auto-fill
-
Check Match Billing to have the Shipping information be the same as the Billing information
Additional Info Tab
The Additional Info Tab is where you can enter optional information for the customer, including answers to the questions in the Question & Answer section.
-
The Active checkbox indicates whether the customer is an active customer or not
-
By default, inactive customers will not appear in searches or in quick lookups from the Sale screen
-
-
If the PO Required checkbox is marked, anytime a Sales Order is created for the customer, a Purchase Order number will be required on the record
-
With a URL in the Website field, clicking Open will open that URL in new tab
-
Use the Notes field for additional information
-
The Question and Answer section allows you to record common questions about the customer along with corresponding answers
Attachments Tab
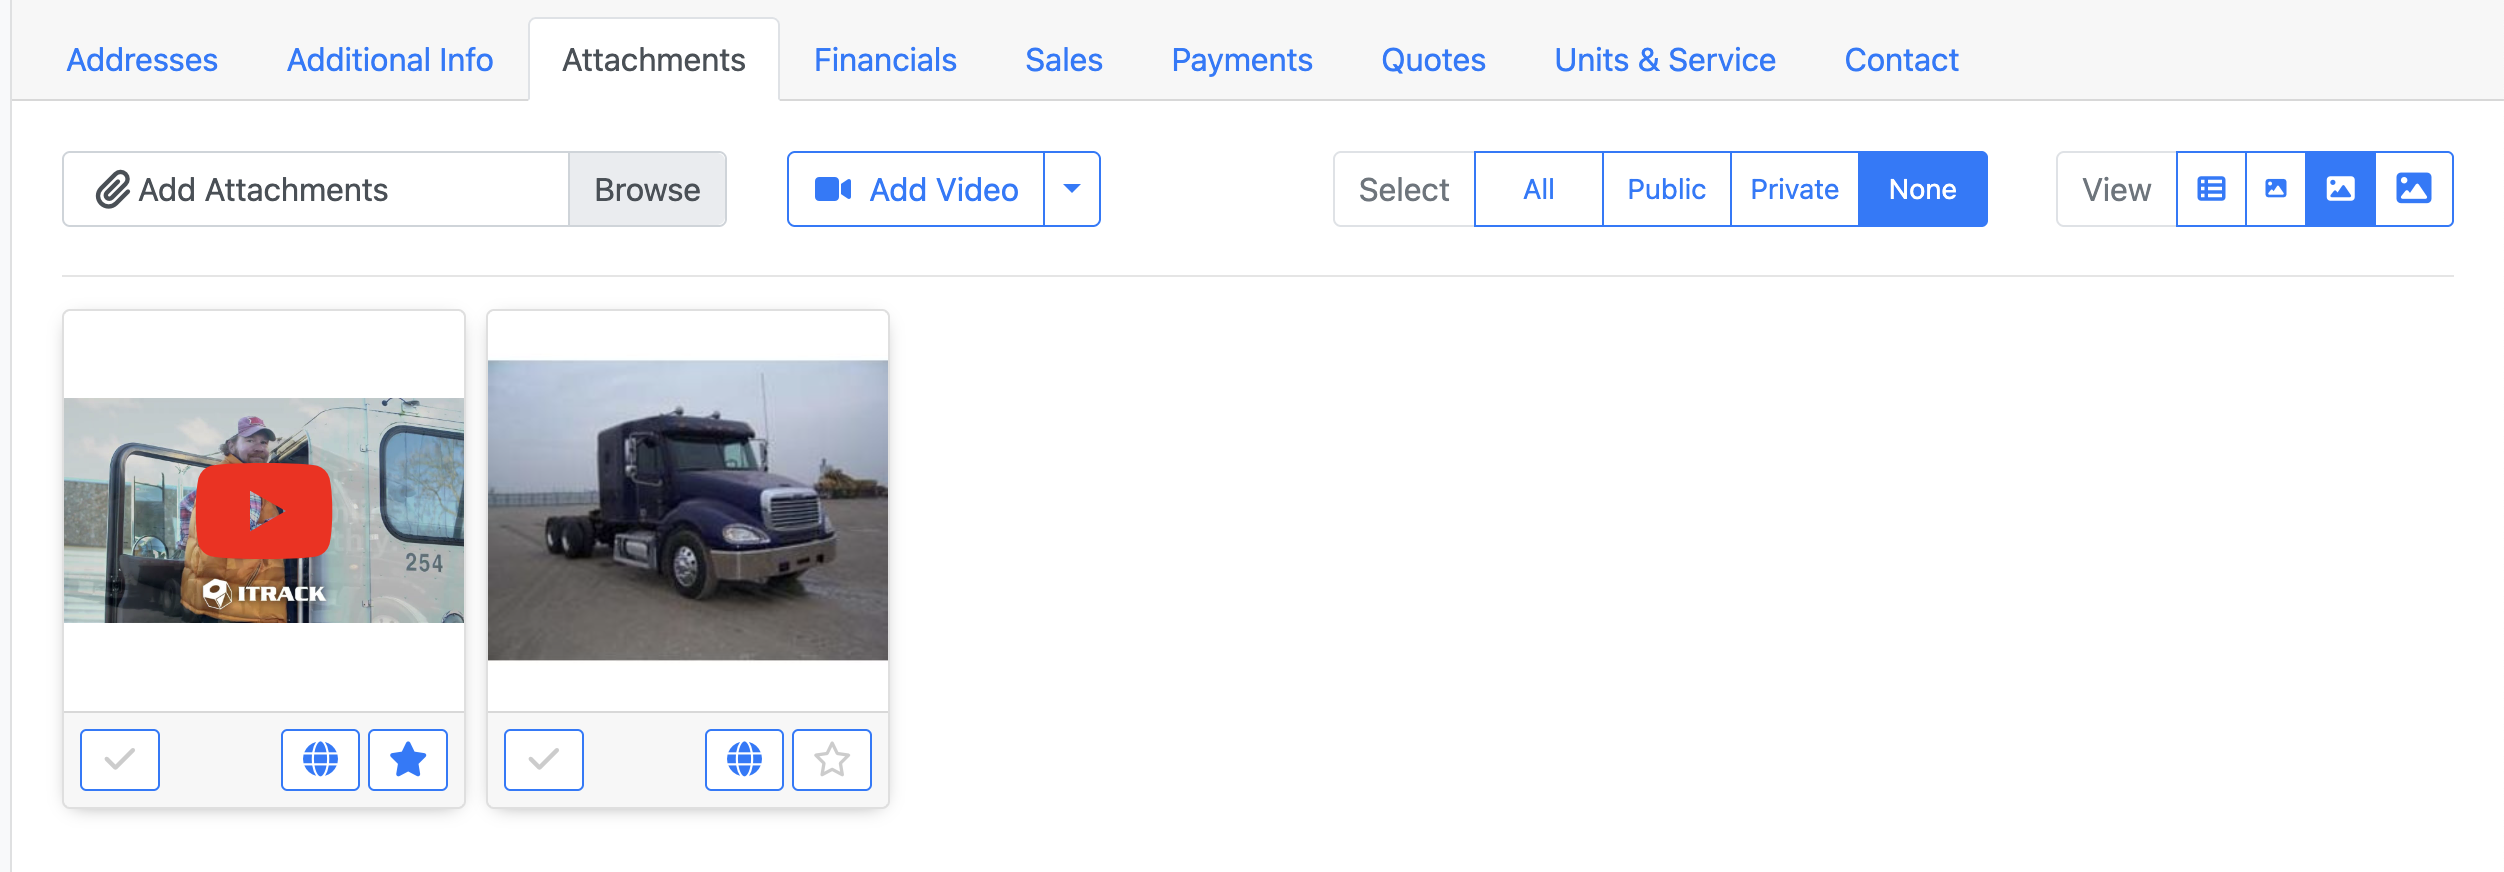
The Attachments tab is where you will go to manage and view any files that have been added to the selected customer.
-
Clicking Add Video allows you enter your Youtube account name and search and select from all videos from that account
-
Click the arrow icon next to Add Video to add a YouTube video using a URL
Financials Tab
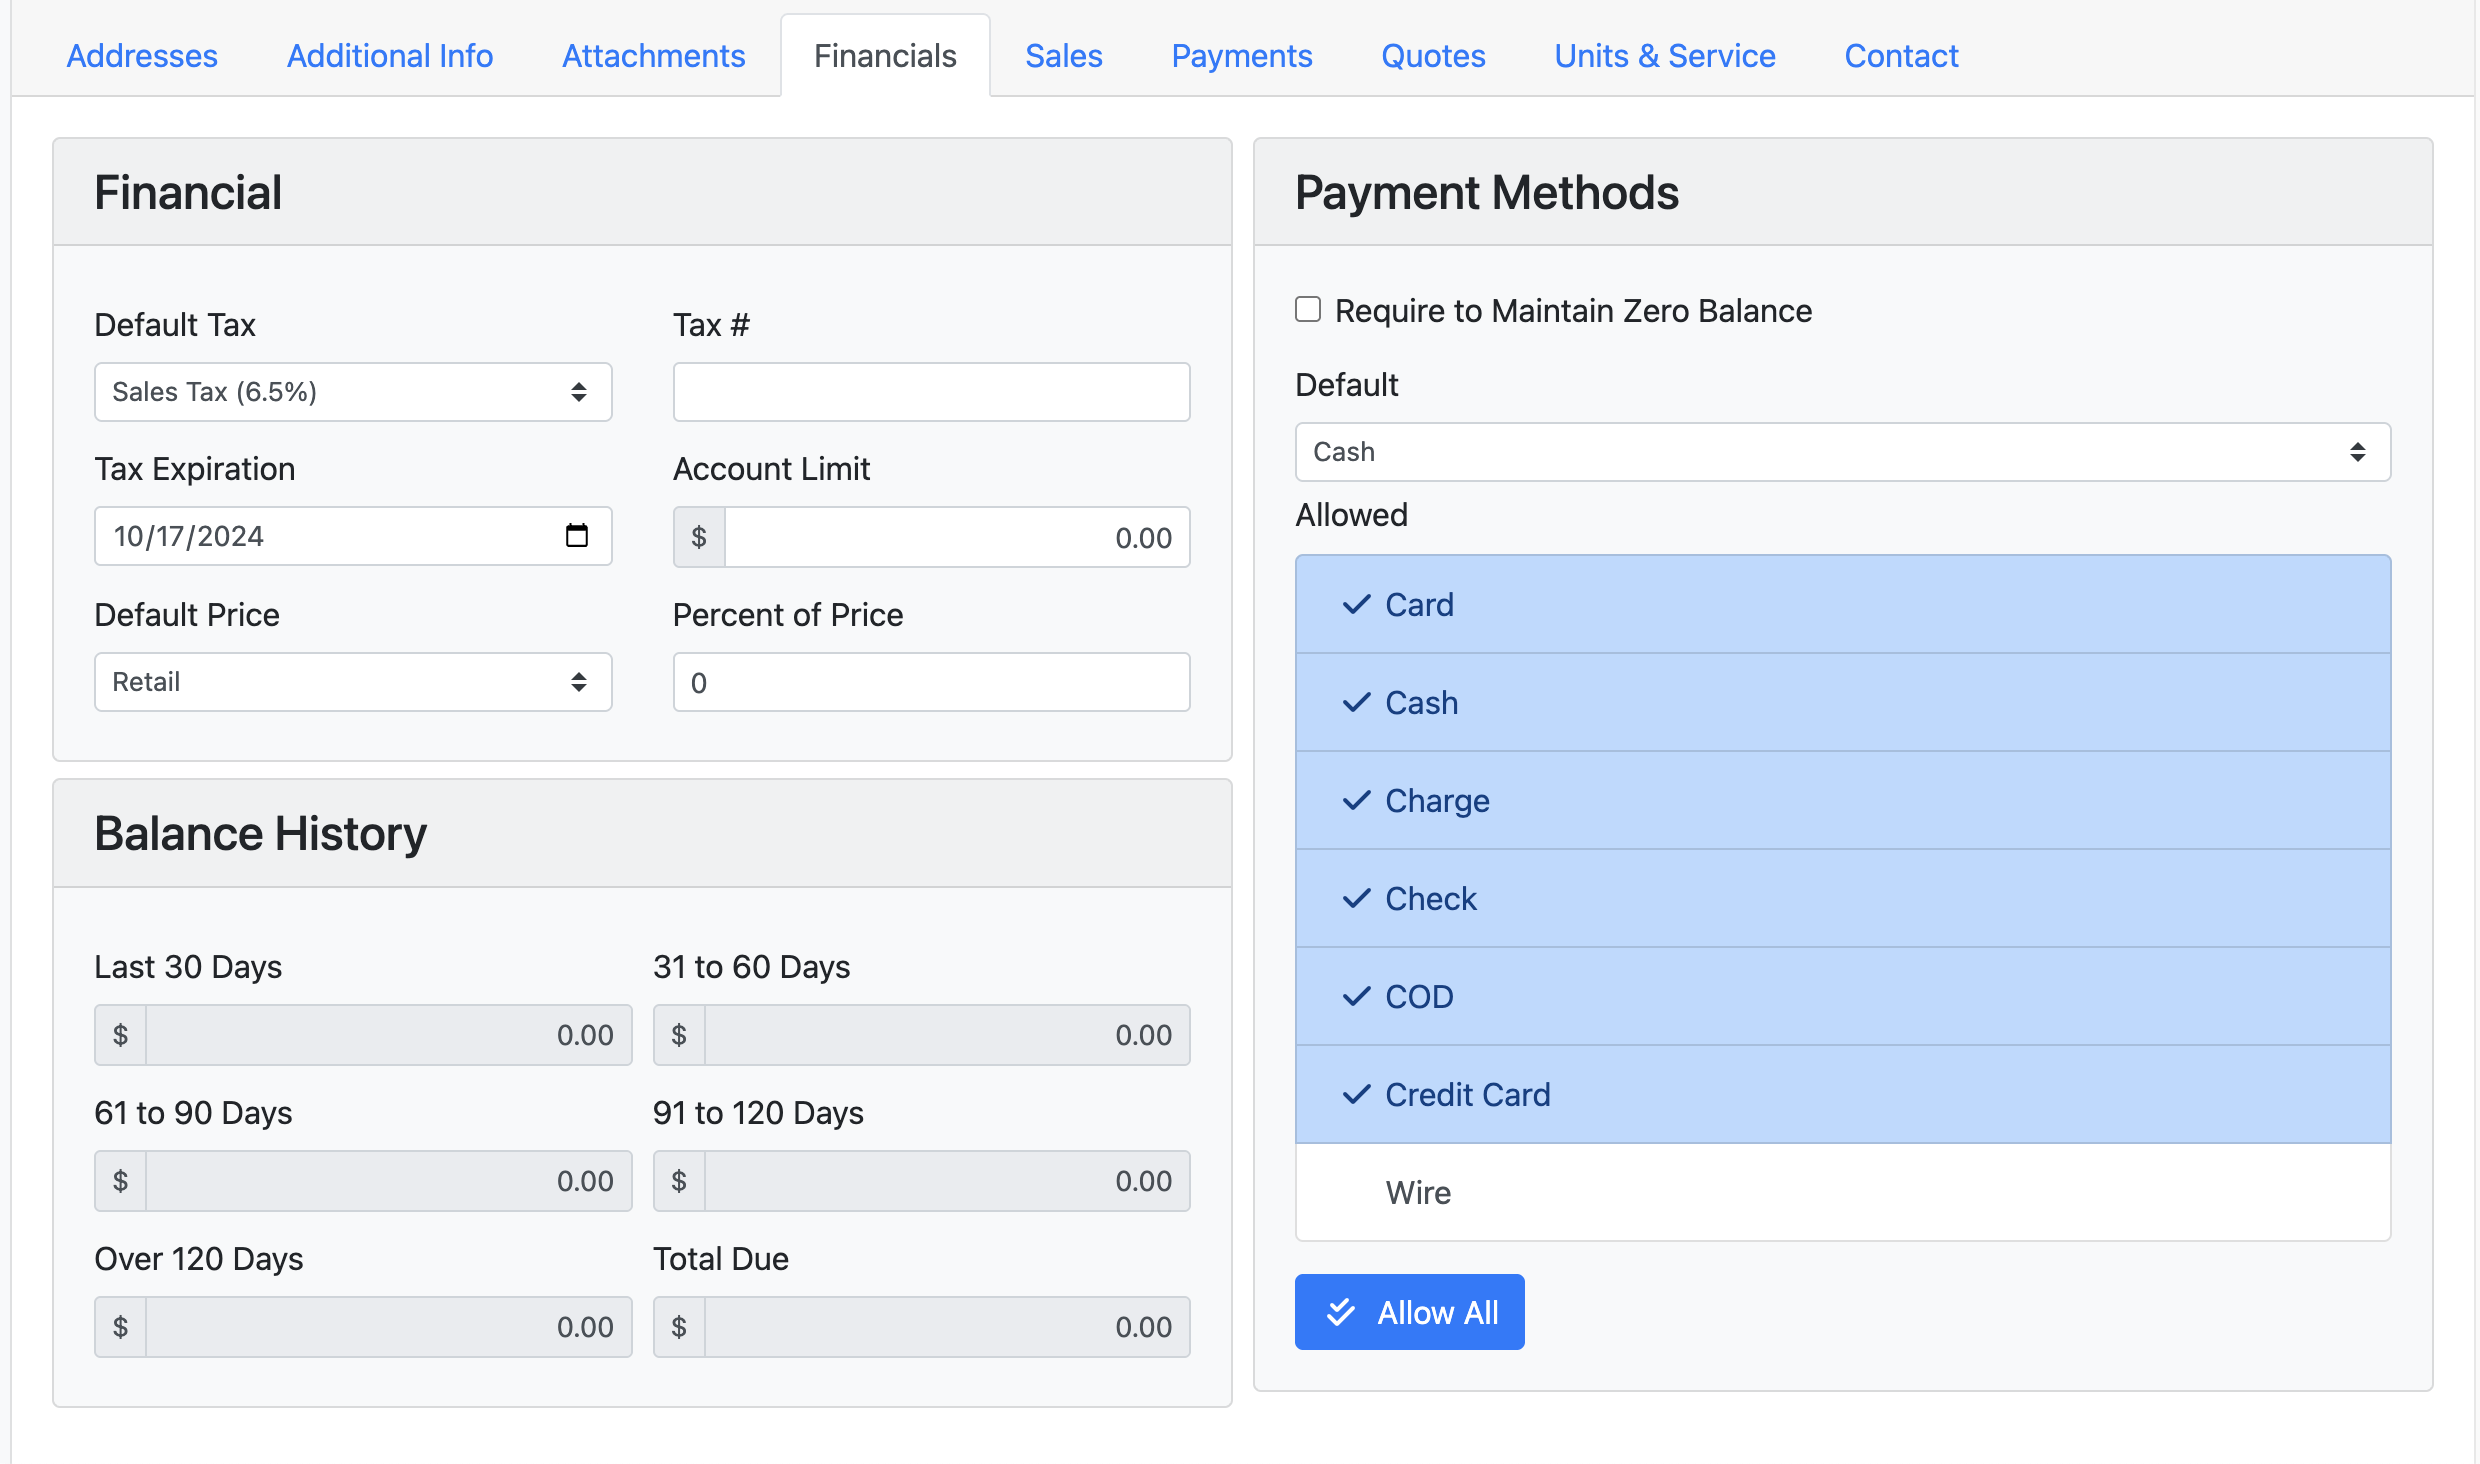
Use the Financials Tab to keep track of any recorded financial information, balances, and payment methods.
-
Set the Default Tax
-
Set a Tax Expiration
-
Use if you need to keep track of tax-exempt customers whose status has an end date
-
-
Set the Default Price from one of many options associated with an inventory option
-
Keep track of the Balance History of a customer
-
Pick which Payment Methods are allowed for a customer
Sales Tab
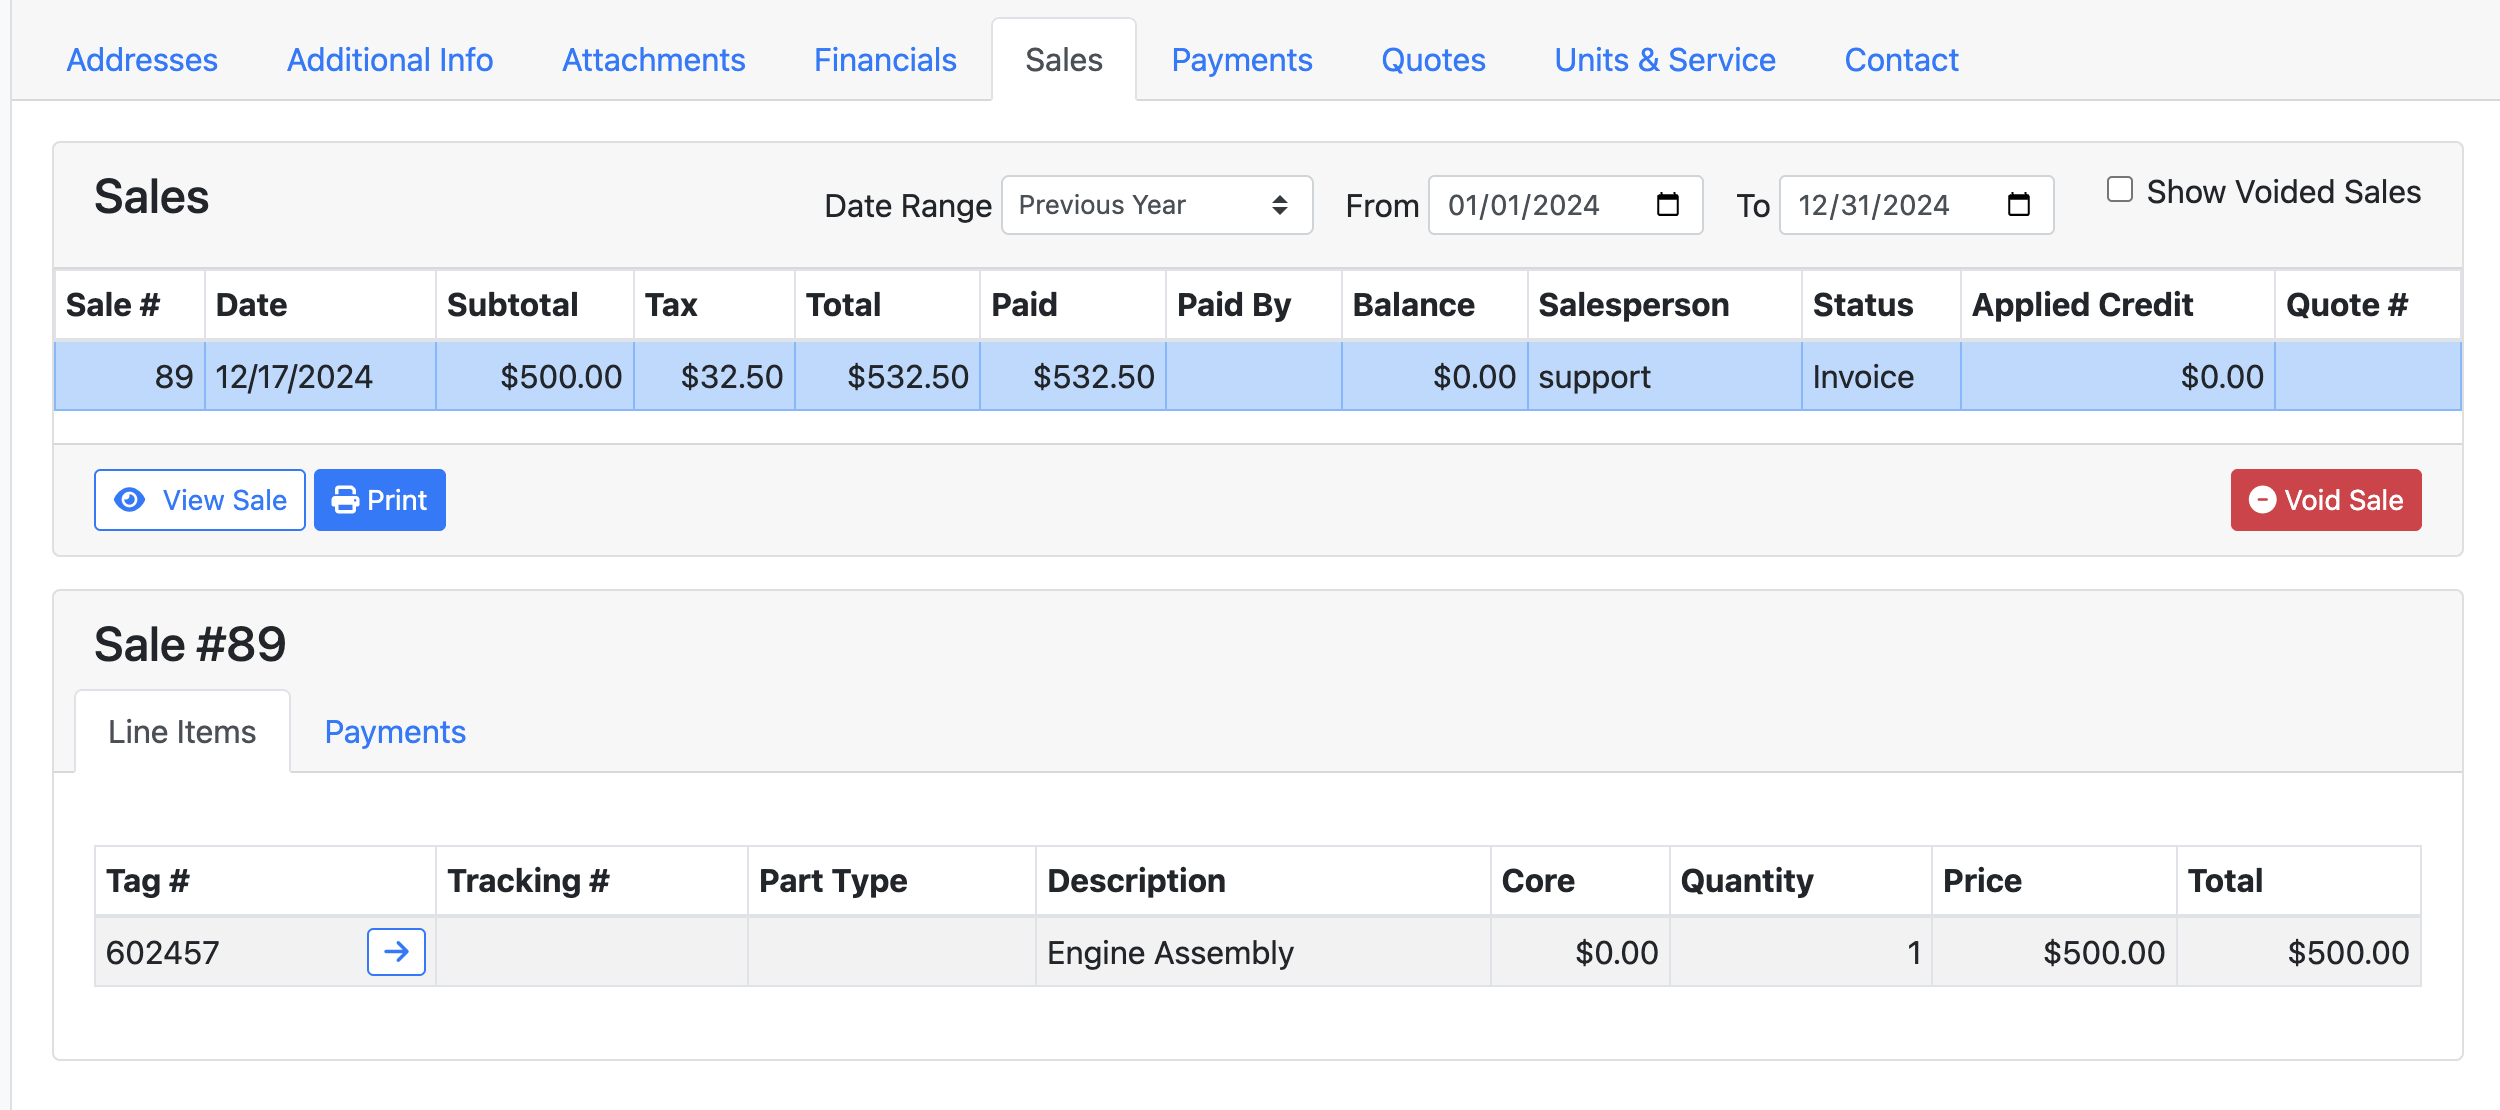
The Sales tab is where you can view and manage past Sales that have been made under the customer’s account.
-
Use the Date Range or Date fields to filter for sales information during a specific period
-
Use the Show Voided Sales checkbox to display or hide voided sales within the Date Range
To interact with a sale, select a sale in the Sales table. Selecting the sale will highlight it blue and populate information in the Sale section. Once you select the sale, you will be able to:
-
View Sale opens the sale in the Sales Screen
-
Print allows you to print, email, or preview the Sales Order
-
Void Sale will void the selected sale
-
Sale ## section:
-
Line Items tab displays all the items involved in the sale
-
Payments tab displays all the payments made in the sale
-
Payments Tab
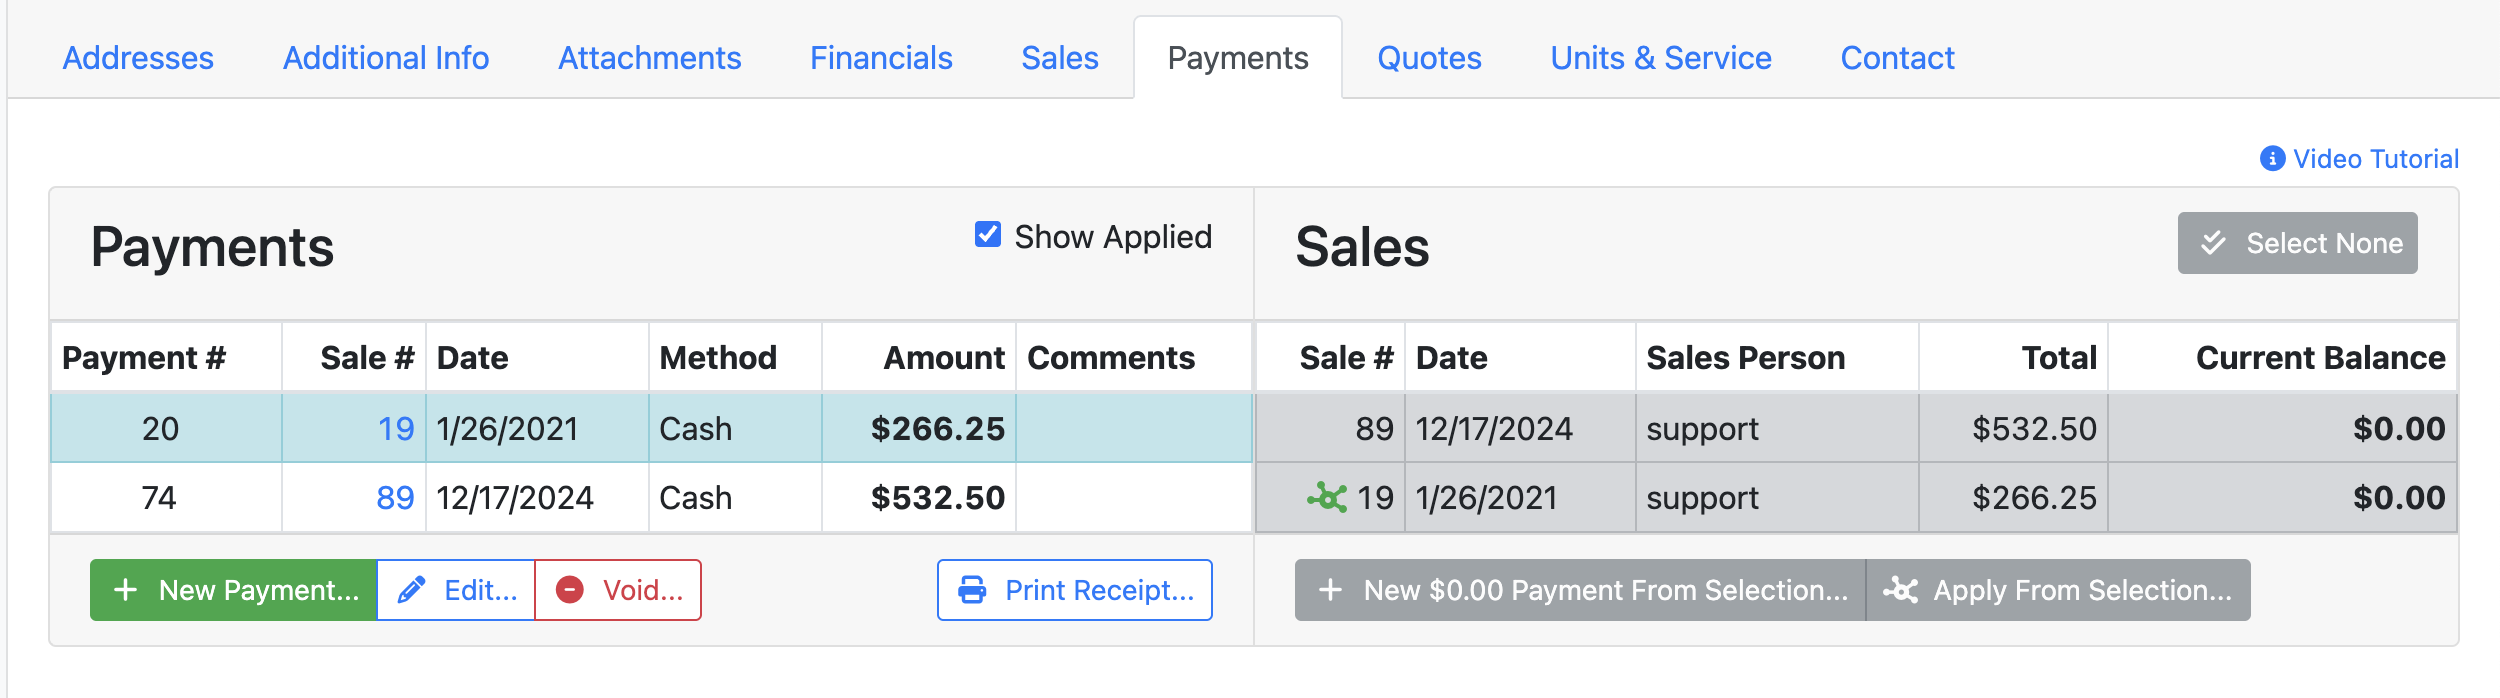
On the Payments tab, you can view and manage past payments made under the customer’s account.
Payments
-
Check the Show Applied checkbox to display previously applied payments
-
Click New Payment… to create a new payment
-
Edit… will open the selected payment in a popup, allowing you to edit the payment information
-
Void… will void the payment
-
Click Print Receipt… to print, email, or preview the sales receipt
Unbalanced Sales
-
With a sale selected, click New $$ Payment From Selection… to create a new payment
Quotes Tab
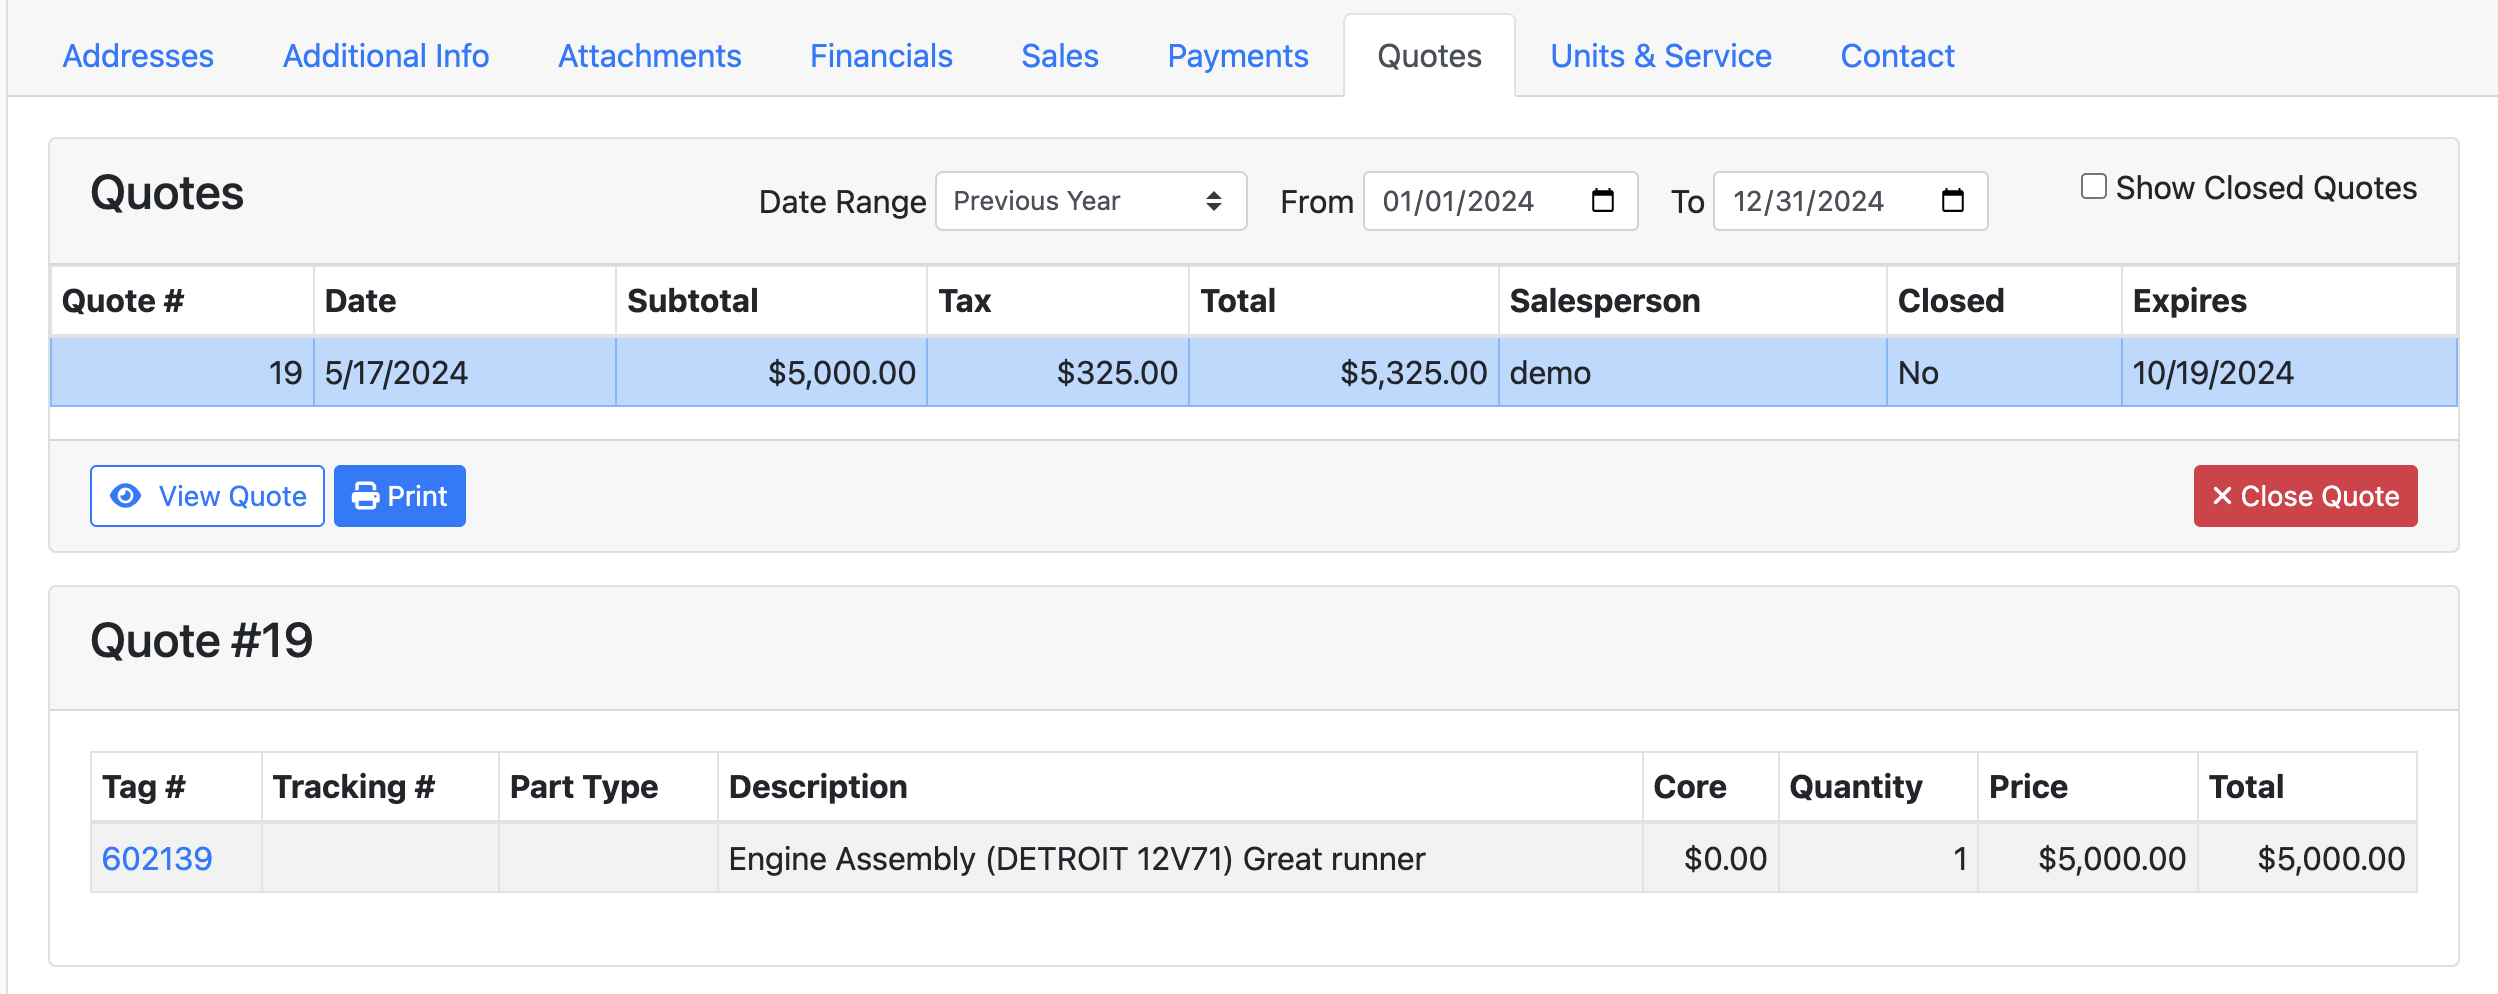
The Quotes tab displays any quotes associated with the customer.
-
Use the Date Range or Date fields to filter for quotes during a specific period
-
Use the Show Closed Quotes checkbox to display or hide closed quotes within the Date Range
To interact with a quote, click one of the quotes in the Quotes table. Clicking on the quote will highlight it blue and populate information in the Quote section. Once you select the quote, you will be able to:
-
View the quote by clicking View Quote
-
Print, email, or preview the quote by clicking Print
-
Click Close Quote to close the quote
-
Quote ## section:
-
Displays inventory items on the quote
-
Units & Services Tab
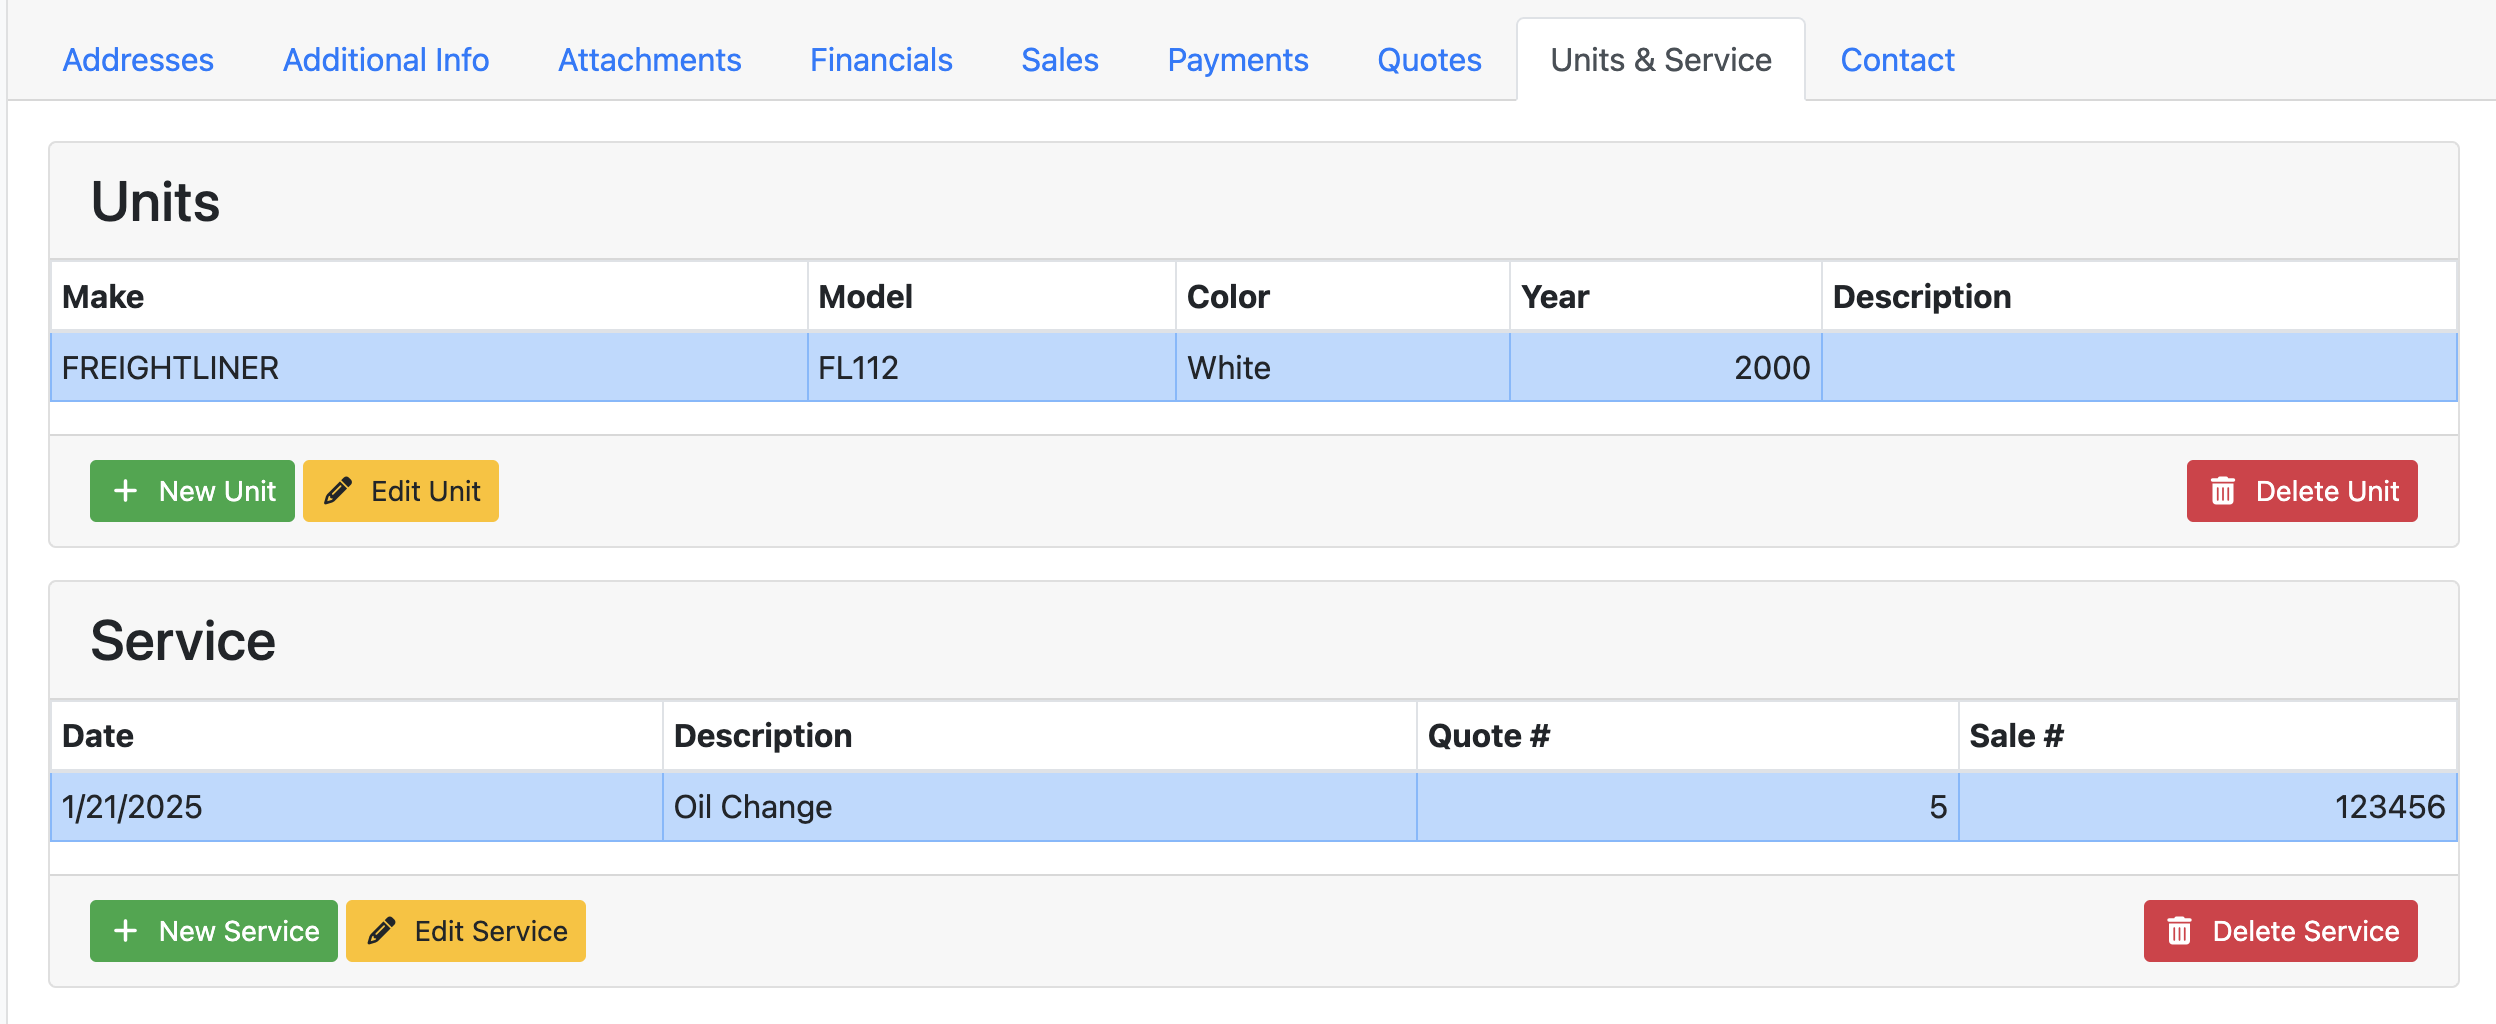
Under the Units & Services tab, you can manage the customer’s vehicles that are serviced by you.
-
Clicking New Unit button allows you to create a new unit
-
To interact with a unit, click one of the units in the Units table. Clicking on the unit will highlight it blue and populate information in the Service section. Once you select the unit, you will be able to:
-
Edit the unit by clicking Edit Unit
-
Click Delete Unit to delete the unit
-
Add service to the unit by clicking New Service
-
Edit previous services by clicking Edit Service
-
Delete services by clicking Delete Service
-
Contact Tab
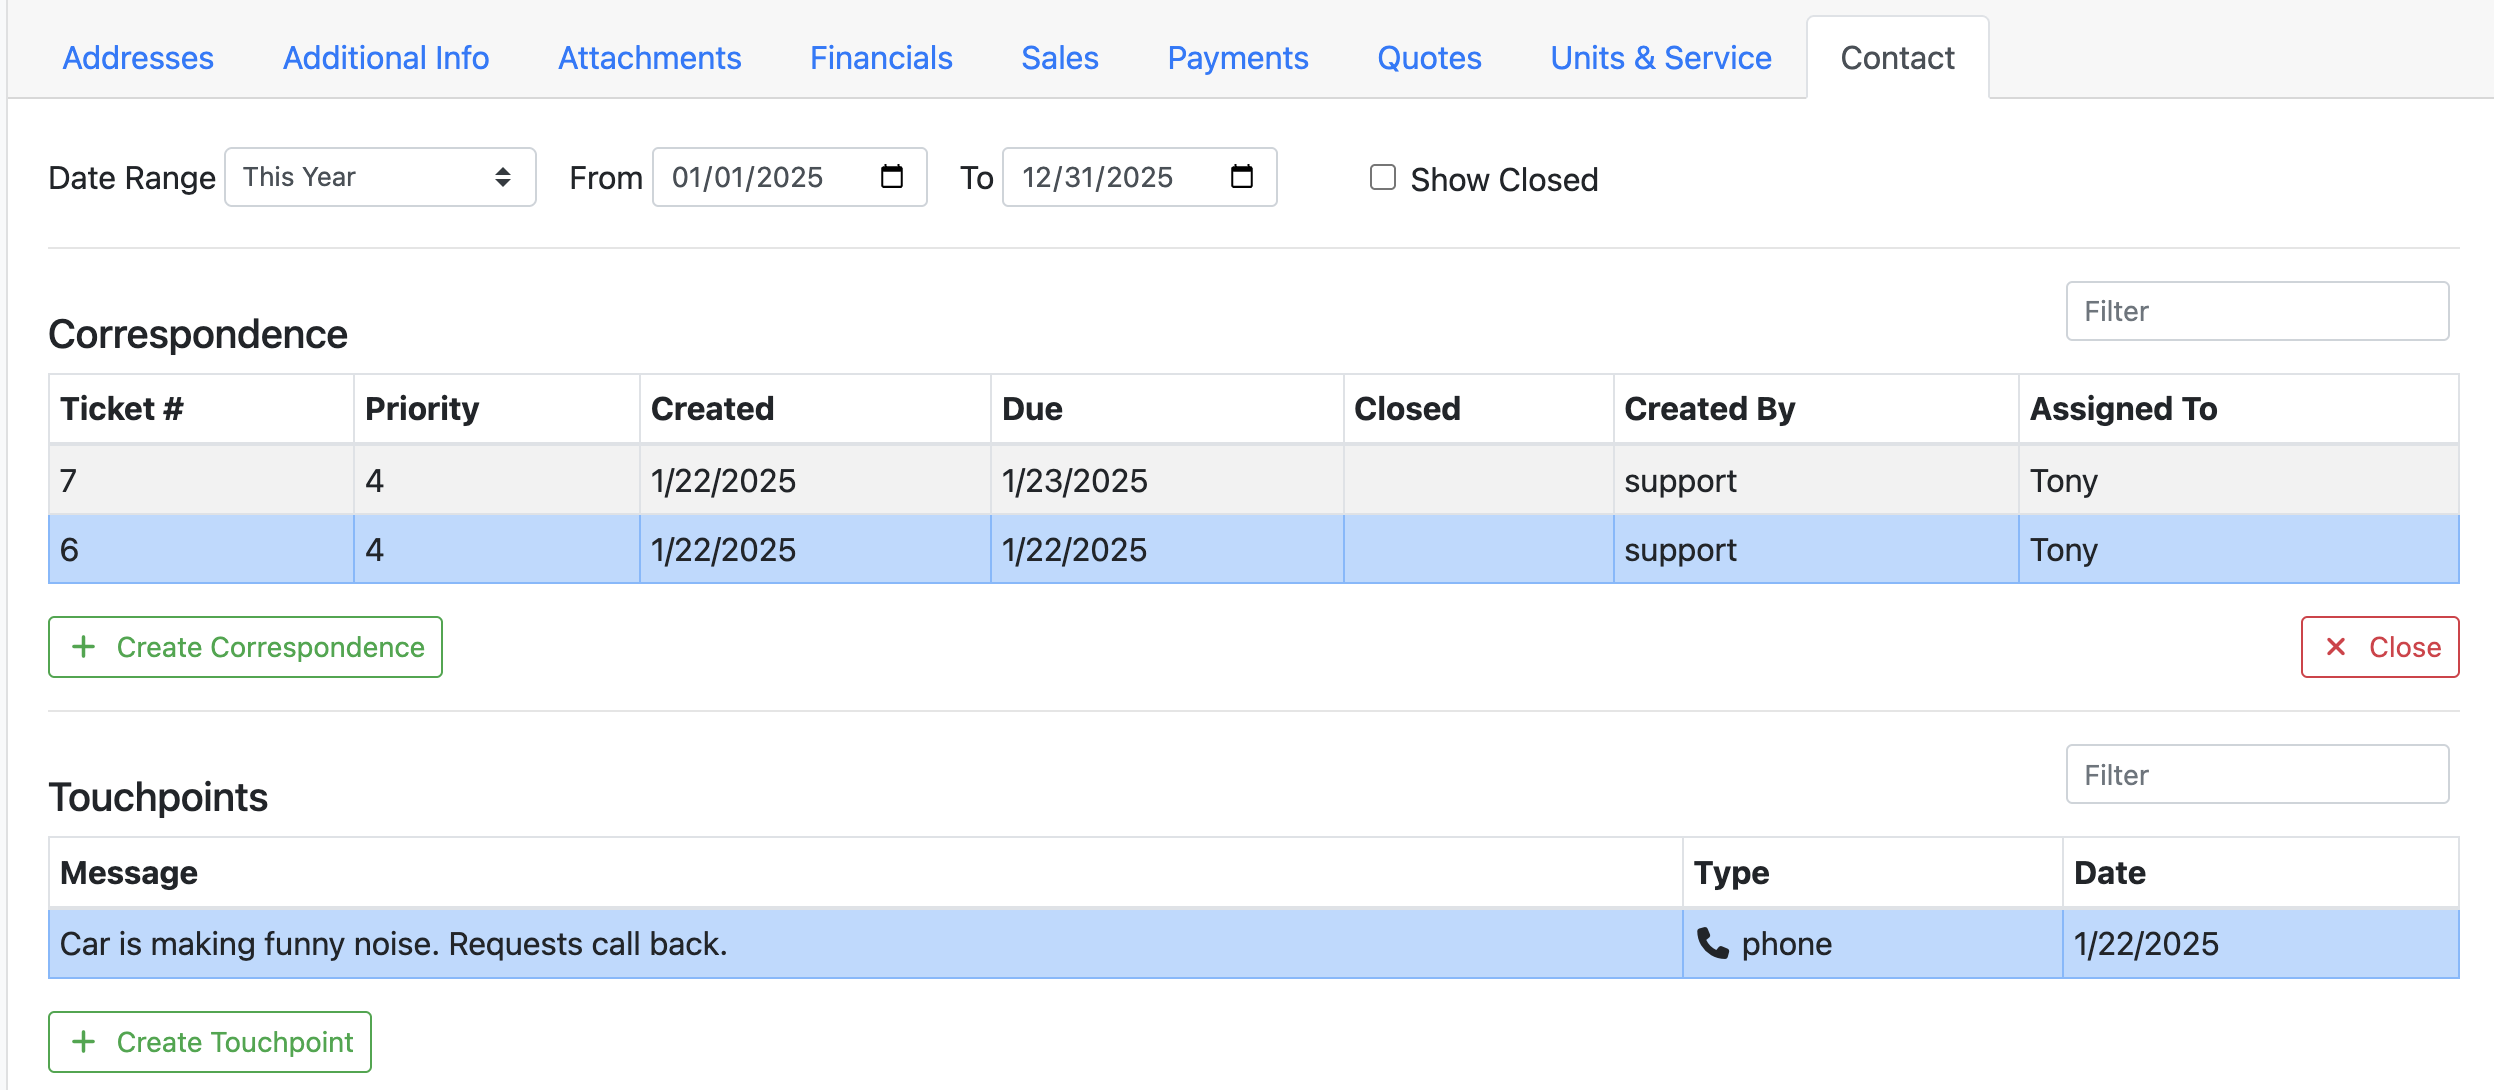
Use the Contact tab to record any communication with the customer.
-
Use the Date Range or Date fields to filter for correspondences during a specific period
-
Use the Show Closed checkbox to display or hide closed correspondences within the Date Range
-
Create a new correspondence by clicking on Create Correspondence
-
To interact with a correspondence, click one of the recorded correspondences in the Correspondence table. Clicking on the record will highlight it blue and display more information in the Touchpoints section. Once you select the correspondence, you will be able to:
-
Close a correspondence by clicking Close
-
Create a new Touchpoint associated with the correspondence
-
Related articles
- ITrack Chromium Knowledge Base
- Home Page
- Searching for Customers
- Getting Started
- Customer Page
- Customer Information
- How To: Create a New Customer
- Sales Order Page
- How To: Create a New Sales Order
- Sales Order Document Types
- Dashboard Page
- Dashboard Chart Types
- Dashboard Report Configuration
- Dashboard User Permissions
- How To: Create a Dashboard Report
- Interchange Page
- Part Page
- Searching for Parts
- Part Information
- How To: Create a New Part
- Purchase Order Page
- How To: Create a New Purchase Order
- QuickBooks Online
- How To: Set Up the QuickBooks Online Integration
- Vehicle Page
- Searching for Vehicles
- Vehicle Information
- How To: Create a New Vehicle
- Vendor Page
- Searching for Vendors
- Vendor Information
- How To: Create a New Vendor
- Scanner Page
- Configuration Page
- eBay Template Tags